Last Updated on June 4, 2023 by ellen
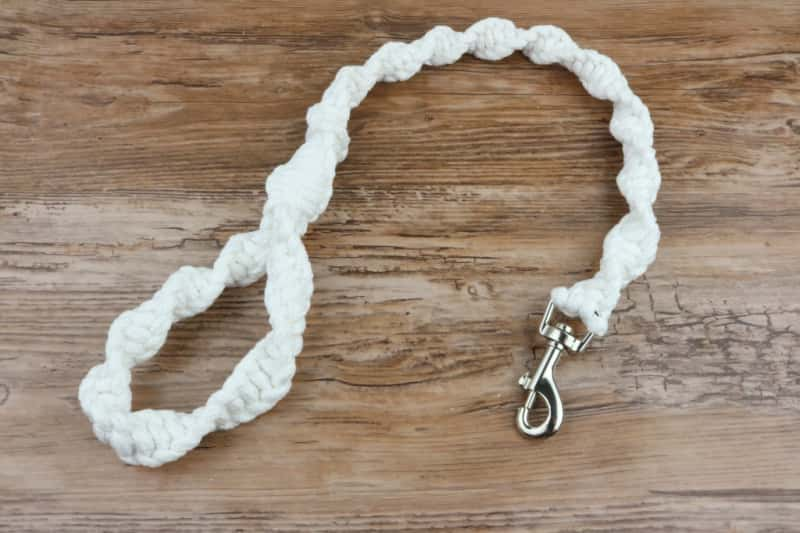
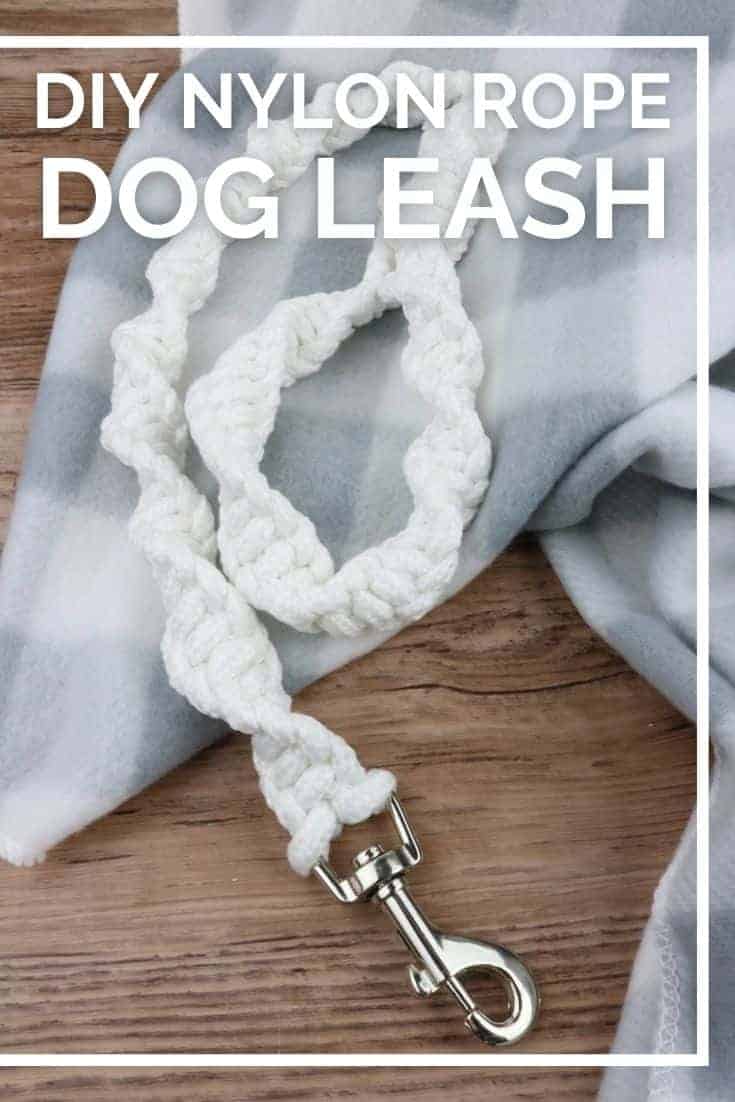
Check out this Nylon Rope Dog Leash DIY and easily make your dog a homemade dog leash. Try this easy DIY leash project today.
Posts may be sponsored. This post contains affiliate links, which means I will make a commission at no extra cost to you should you click through and make a purchase. As an Amazon Associate I earn from qualifying purchases.
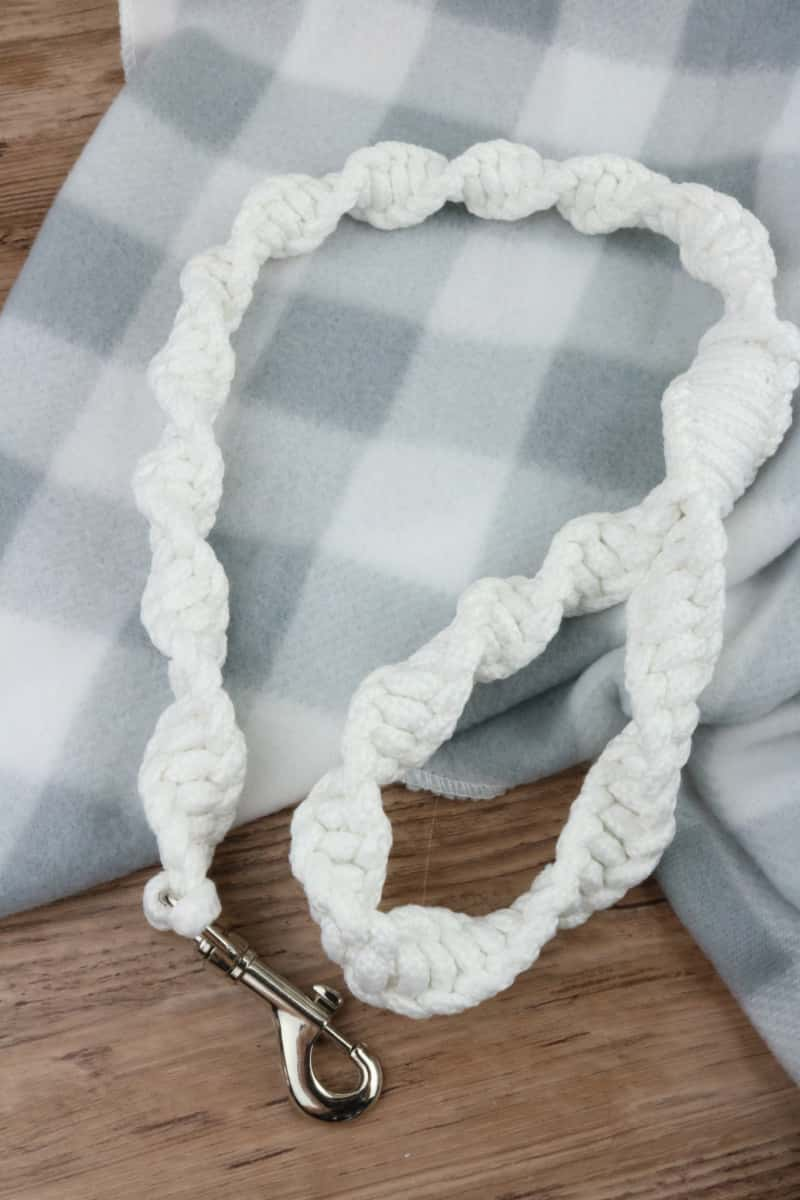
Table of Contents
Nylon Rope Dog Leash DIY
There are lots of stylish dog accessories you can treat your pet to. But, I love when I can make them myself to save money.
And, a leash is at the top of my beach essentials for dogs. Don’t leave home this summer without a thick rope dog leash.
Lots of people prefer to use a nylon dog leash because it has more give to it than other types. This means that it’s a bit more gentle to your arm and shoulder if you’re walking a larger breed dog.


This product presentation was made with AAWP plugin.
So, you can buy a nylon rope dog leash at just about any pet store out there from Petco to PetSmart. But, you can easily make your own with this nylon rope dog leash DIY.
This makes a leash that is about 2 feet long when done. If you want a longer leash, just use a longer line. You just want to be sure that the outside part of the line is about five times longer than the center part of the line.
What do I need to make this craft?
- Scissors
- (1) Dog Snap
Now, if you can’t find a nylon blend, you can use a cotton/poly blend instead. Or, use a 100% cotton rope if you want to make a cotton rope leash instead.
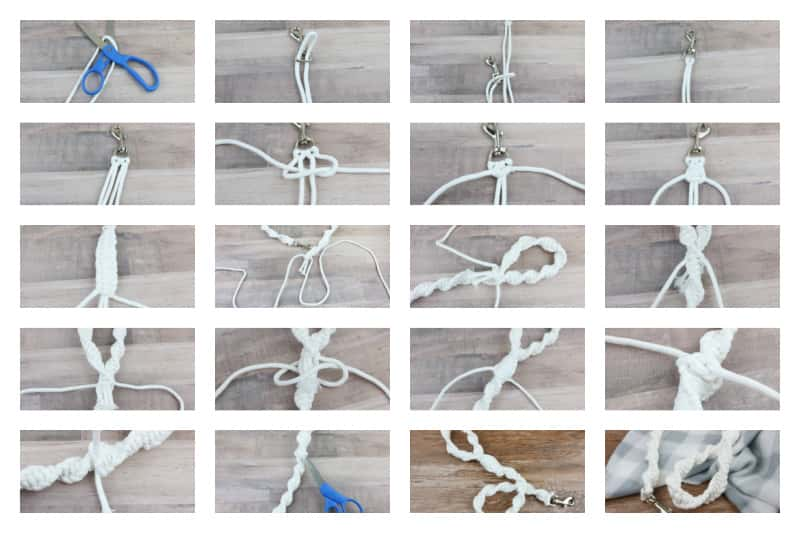
Check out the step-by-step photos to make this nylon rope dog leash DIY. Or, see the video at the end of the post if that’s easier.
How do you make a braided rope dog leash?
- First, start by cutting the 30 feet of line in half. This will form the base for your nylon braided dog leash.
- Take one piece and fold it so there are about 30 inches on one side with the rest on the other. Then push the loop through the hook. Make sure you have it so the 30-inch line is in the center of the hook and not the outside.
- Then run the ends of the line through that loop.
- Pull the ends until the line/loop is tight on the hook to hold it in place.
- Do the same with the other line. Make sure that the 30-inch side is in the center with the other one.
- Take the outer line on the right and run it behind all the others so that there is a loop on the right. Then take the line on the left and run it over top them all so there is a loop on the left. Take the top line and run it through the loop on the right and the bottom line pull it through the loop on the left.
- Pull both lines so they are nice and tight. This is one of the most important steps to make a nylon rope dog leash.
- Keep repeating steps 6 & 7.
- It should look like the picture when you have done about 13 ties. As you go it will start to twist on its own.
- Stop when you get almost the ends of the center lines. The ones that are 30 inches.
- Fold the end over to form a handle. I made my handle about 4 inches or so. Run the long ends through the side loops of the leash to join the handle to the leash.
- Now, do steps 6 & 7. This time we will not only be covering over the small parts of the centerline that are left, but we will also be wrapping the leash as well.
- Keep repeating the steps until you have about 6 inches or so of line left. Should be about 8-10 knots.
- Tightly tie the two lines together.
- Cut off the ends so that it is about an inch long.
- Take the ends of the scissors or another like object and tuck the ends under the knots you just made to hide them.
Related Reading
Nylon Rope Dog Leash DIY
Check out this Nylon Rope Dog Leash DIY and easily make your dog a homemade dog leash. Try this easy DIY leash project today.
Materials
- 30 feet of nylon clothesline rope
- Scissors
- Dog snap
Tools
- scissors
Instructions
- Start by cutting the 30 feet of line in half.
- Take one piece and fold it so there is about 30 inches on one side with the rest on the other. Then push the loop through the hook. Make sure you have it so the 30-inch line is in the center of the hook and not the outside.
- Then run the ends of the line through that loop.
- Pull the ends until the line/loop is tight on the hook to hold it in place.
- Do the same with the other line. Make sure that the 30 inch side is in the center with the other one.
- Take the outer line on the right and run it behind all the others so that there is a loop on the right. Then take the line on the left and run it over top them all so there is a loop on the left. Take the top line and run it through the loop on the right and the bottom line pull it through the loop on the left.
- Pull both lines so they are nice and tight.
- Keep repeating steps 6 and 7.
- Should look like the picture when you have done about 13 ties. As you go it will start to twist on its own.
- Stop when you get almost the ends of the center lines. The ones that are 30 inches.
- Fold the end over to form a handle. I made my handle about 4 inches or so. Run the long ends through the side loops of the leash to join the handle to the leash.
- Now do steps 6 and 7. This time we will not only be covering over the small parts of the centerline that are left, but we will also be wrapping the leash as well.
- Keep repeating the steps until you have about 6 inches or so of line left. Should be about 8-10 knots.
- Tightly tie the two lines together.
- Cut off the ends so that it is about an inch long.
- Take the ends of the scissors or another like object and tuck the ends under the knots you just made to hide them.

Ellen runs a small pet sitting business in southern Vermont. She has experience with a variety of small animals, dogs and cats. She has also cared for ducks, chickens and rabbits. Combined, she has over 20 years of experience in pet care and pet sitting.